DIY Felt Nativity Scene: Free Patterns + Step-by-Step Tutorial
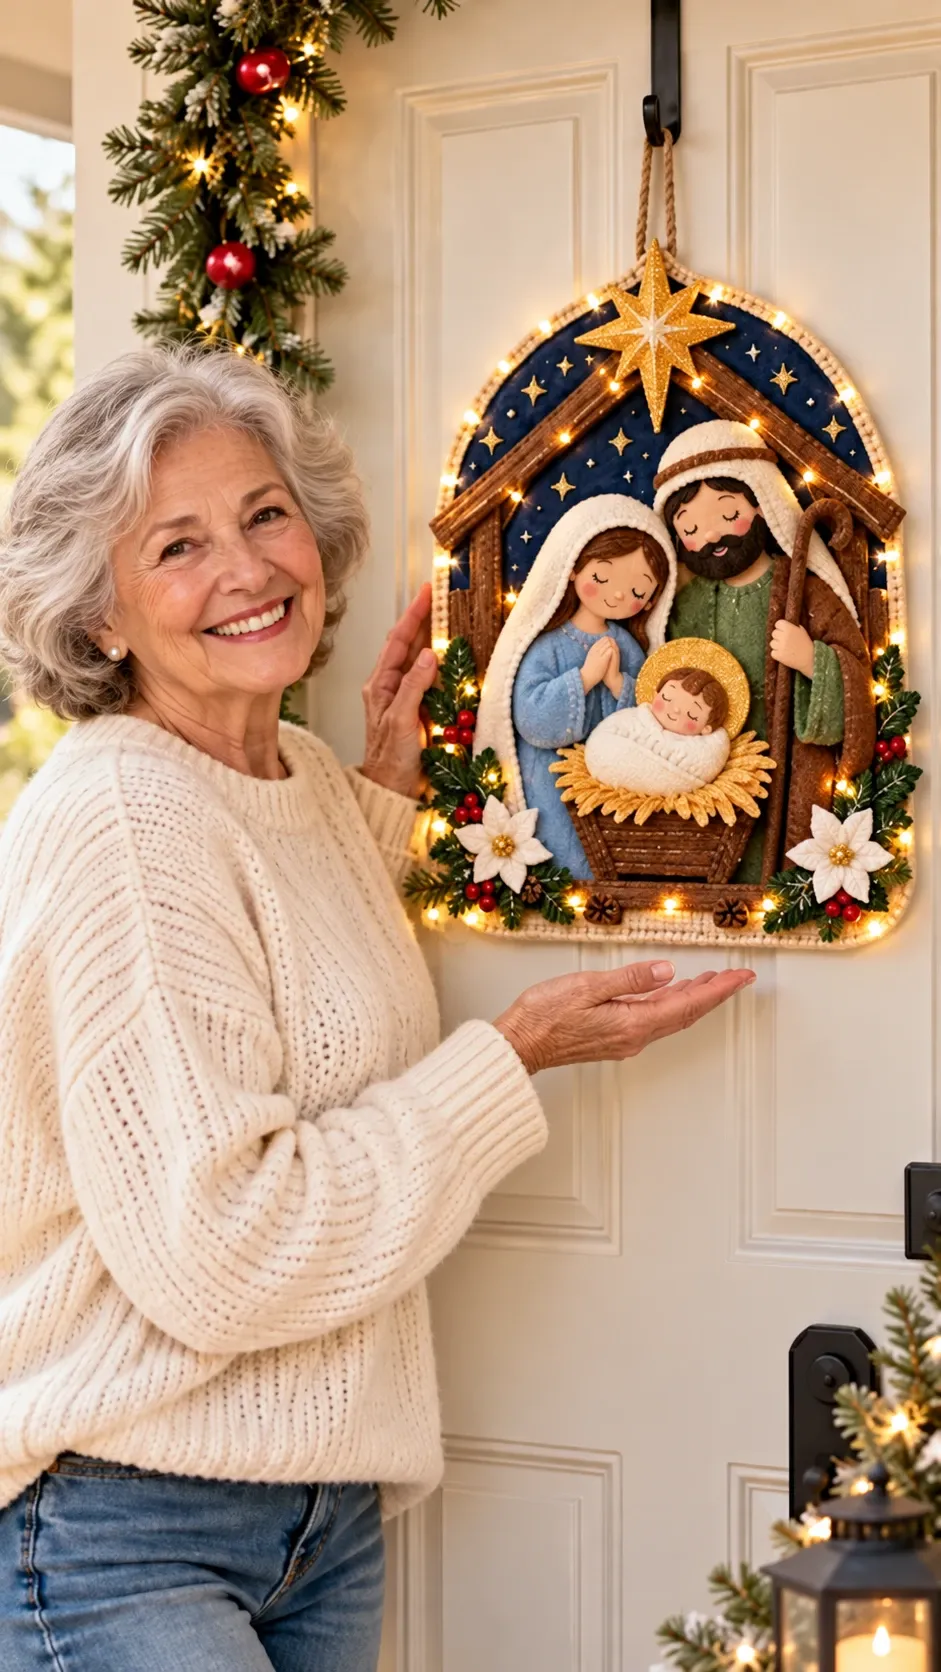
A handmade nativity can look detailed without requiring advanced sewing skills. The key is not stuffing every piece heavily. Most of the structure comes from a firm backing board, thin foam between selected felt layers and careful placement before anything is permanently glued.
This version combines visible hand stitching with glued assembly, which keeps the figures decorative and dimensional without making the finished piece too heavy for a door or wall.
What the finished felt nativity looks like
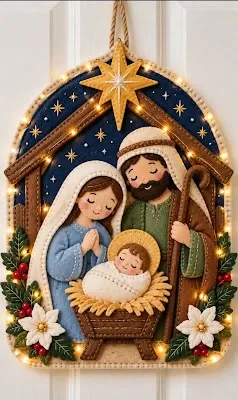
The design uses a dark blue arched background with a brown stable frame, Mary in blue and cream, Joseph in green and brown, baby Jesus in a small manger, a large gold star and Christmas greenery around the lower corners.
The finished piece is designed to hang vertically, so the rigid backing matters just as much as the decorative felt work.

Felt nativity pattern sheets
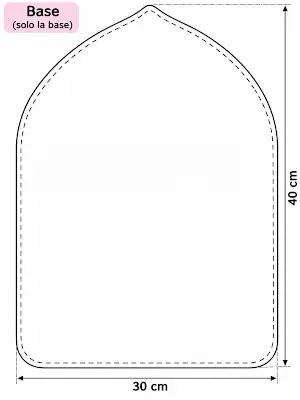
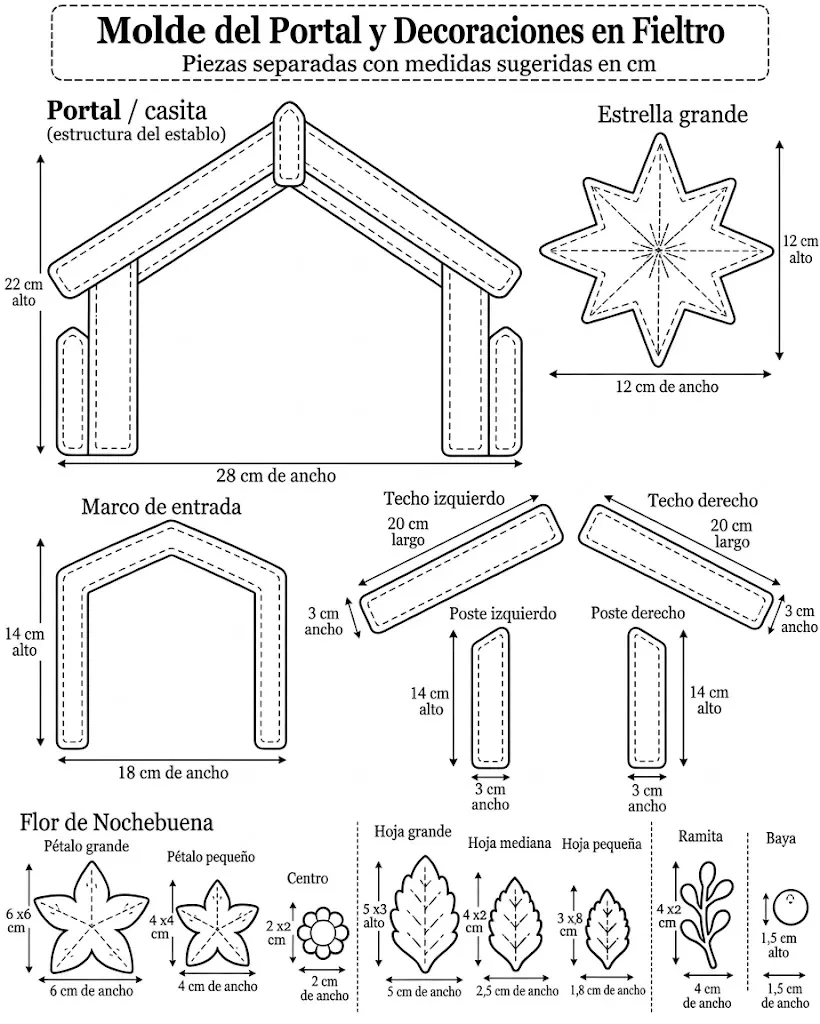
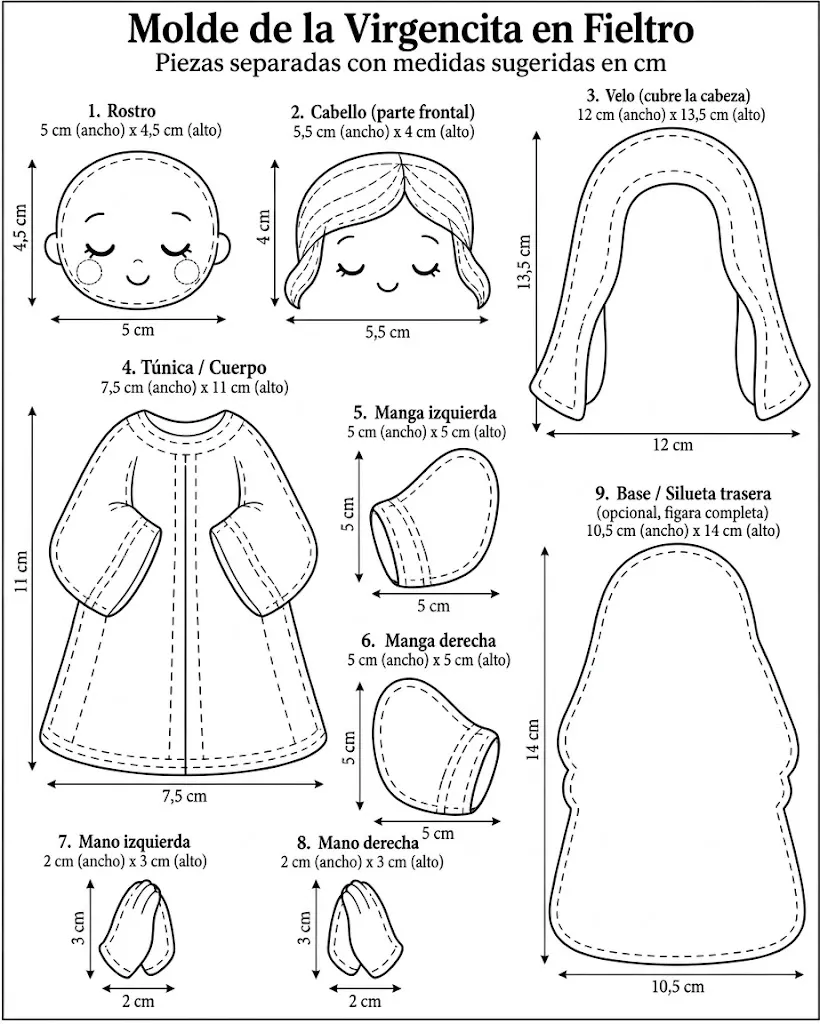
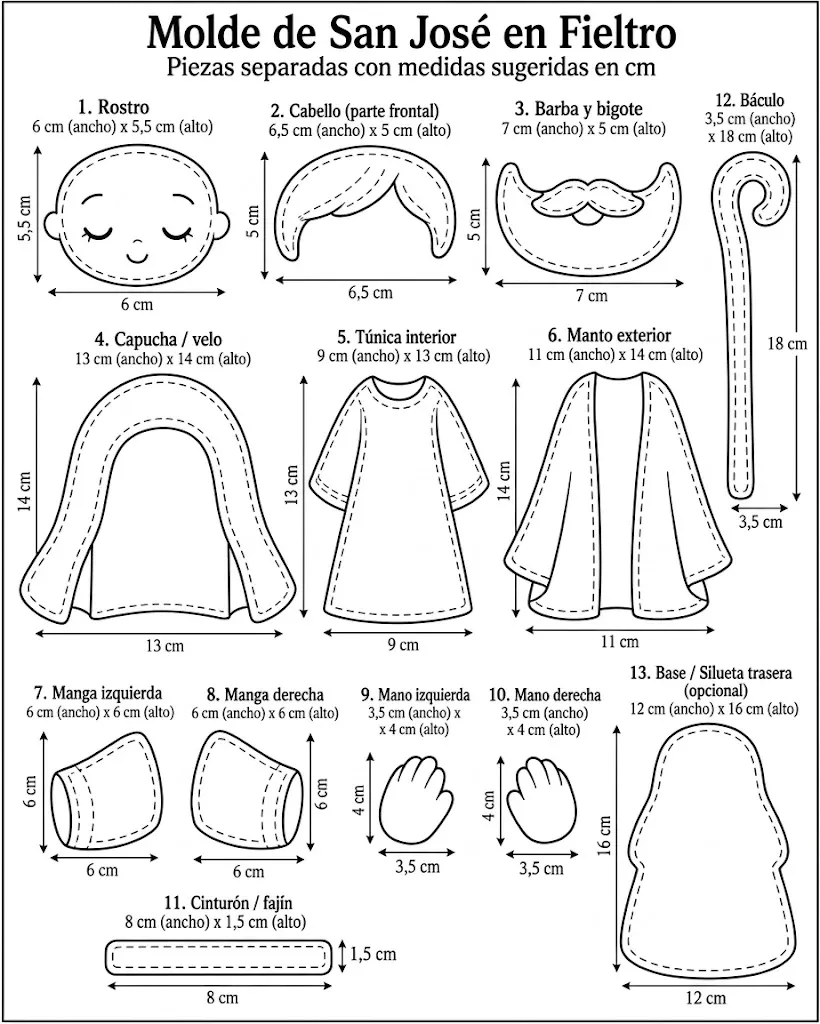
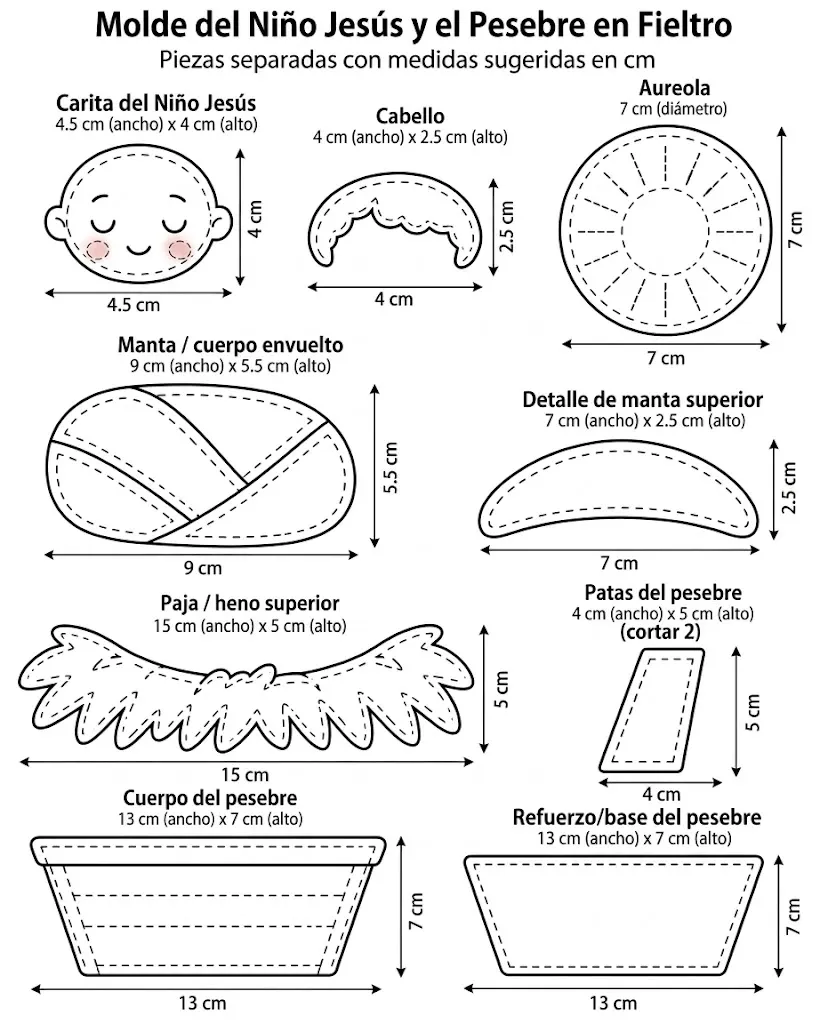
The supplied pattern set includes the complete layout, the rigid base, the stable structure and decorations, Mary, Joseph, baby Jesus and the manger.

Materials for the felt nativity
The project uses ordinary craft felt plus a rigid internal backing. The design combines several neutral Christmas colors with navy blue, muted green and gold.

- Navy blue felt for the background
- Skin-tone felt
- White or cream felt
- Light blue felt
- Olive green felt
- Several shades of brown felt
- Mustard yellow or gold felt
- Dark green felt for leaves
- Red felt for berries
- 2–3 mm gray board, bookbinding board or similar rigid cardboard
- Thin craft foam, approximately 2–3 mm
- Embroidery floss or pearl cotton thread
- Hand-sewing needle
- Fabric scissors
- Heavy scissors or craft knife for the board
- Ruler
- Pencil or erasable fabric marker
- Liquid craft glue
- Hot glue gun
- Battery-powered micro LED lights
- Jute cord or another strong hanging cord
- Blush or dry pastel for cheeks
- Black fabric paint or embroidery thread for facial details
- Optional small beads for flower centers
Before you start: 7 details that make the project sturdier
How to make the felt nativity scene step by step
Complete each figure separately before permanently attaching it to the backing. That makes facial details, hand stitching and small adjustments much easier.
Cut and reinforce the base
Trace the 40 × 30 cm arched base onto rigid gray board or bookbinding board. Cut two matching pieces and glue them together evenly.

Press the layers flat under books or another broad weight until the adhesive has fully dried.

Cover the front and back with navy felt
Cut the front felt slightly larger than the rigid base. Apply glue in small sections, smooth the felt over the front and fold the extra material neatly around the edges.
Cover the rear with another piece of felt so no exposed cardboard remains.

Prepare the felt stable frame
Use the stable pattern to cut the two roof pieces, the vertical posts and the smaller entrance frame from brown felt.
For a slightly raised effect, place a thin 2–3 mm foam layer between two felt layers and stitch around the outside. Do not attach the stable permanently yet.
Place it on the blue backing first to confirm the width and height against the complete layout pattern.
Make Mary
Cut the face, hair, veil, tunic, sleeves and hands from the corresponding felt colors.
A thin foam layer can be placed inside the main body to create gentle dimension without turning the figure into a heavily stuffed doll.

Create the face while the head piece is still flat. Add the eyes, mouth and lashes with black fabric paint or embroidery, then add a little blush to the cheeks.

Assemble the tunic and sleeves, keeping the padding light and the seams even.

Finish by positioning the veil around the head and placing the hands together at the front.


Make Joseph and his staff
Cut Joseph's face, hair, beard, mustache, hood, tunic, mantle, sleeves, hands and staff from the pattern sheet.
Build the face first, then layer the hair, beard and mustache over it. Assemble the clothing with the same light padding used for Mary so both figures have similar depth.

Make baby Jesus and the manger
Prepare the baby's face, hair and halo first. Wrap the body in white or cream felt with only a very thin layer of foam inside.
For the manger, cut the structural pieces from thin cardboard and cover them with brown felt. Add mustard or gold felt pieces above the manger to suggest straw.

Make the star, poinsettias, leaves and berries
Cut the large star from mustard yellow or gold felt. A thin foam insert gives it enough dimension to stand out against the dark blue background.


Layer the poinsettia petals and add a small center piece or optional bead. Combine large and small leaves with branches and red berries to build the lower floral clusters.


Dry-fit, glue, add the lights and finish the hanger
Before gluing anything, place every finished component on the blue backing. Check the balance of the stable, figures, manger, star and floral pieces.

Once the layout looks right, take a reference photo. Then begin attaching the layers from back to front.
Glue the stable first.

Add Mary and Joseph next, followed by the manger and baby Jesus. Finish with the star, greenery, poinsettias and smaller embellishments.

Wrap battery-powered micro LED lights around selected areas of the stable and greenery, tucking the thin wire behind the felt pieces where possible.

Keep the battery compartment accessible on the back. Add a strong hanging cord directly to the rigid backing and reinforce the attachment area before covering it with the rear felt.

The result is a dimensional but relatively flat felt nativity that can hang on an interior door or wall throughout the Christmas season.
How to keep the nativity from bending
The most important structural decision happens before any decorative sewing begins: the backing cannot be made from felt alone.
Two aligned layers of 2–3 mm rigid board provide the support needed for the figures, flowers and LED lights. Covering both sides with felt then hides the structural material and gives the finished piece a cleaner appearance.
The figures themselves should remain lightly padded. Heavy stuffing adds unnecessary weight and pushes the project away from the flatter appliqué look the design was created for.
Where to display the finished felt nativity
At roughly 48 cm tall overall, this is large enough to work as a focal Christmas decoration rather than a small ornament.
It can hang on an interior door, an entryway wall, beside the Christmas tree or above a seasonal console display. If you're using battery LEDs, choose a place where the battery compartment on the back remains easy to reach.
Frequently asked questions
How large is the finished felt nativity?
The main backing pattern measures approximately 40 × 30 cm. The complete layout reaches about 48 cm high once the upper star and hanging section are included.
Can a beginner make this felt nativity?
Yes. The project has many individual pieces, but the construction is mostly cutting, simple hand stitching, light padding and glued assembly. Completing each figure separately and dry-fitting the full layout before gluing makes the process easier to manage.
What keeps the felt nativity from bending?
Use a rigid 2–3 mm board behind the felt rather than relying on felt alone. Two glued layers provide additional stiffness, while thin foam inside selected figures adds dimension without making the decoration excessively heavy.